Sabi Platform Onboarding Guide
Introduction
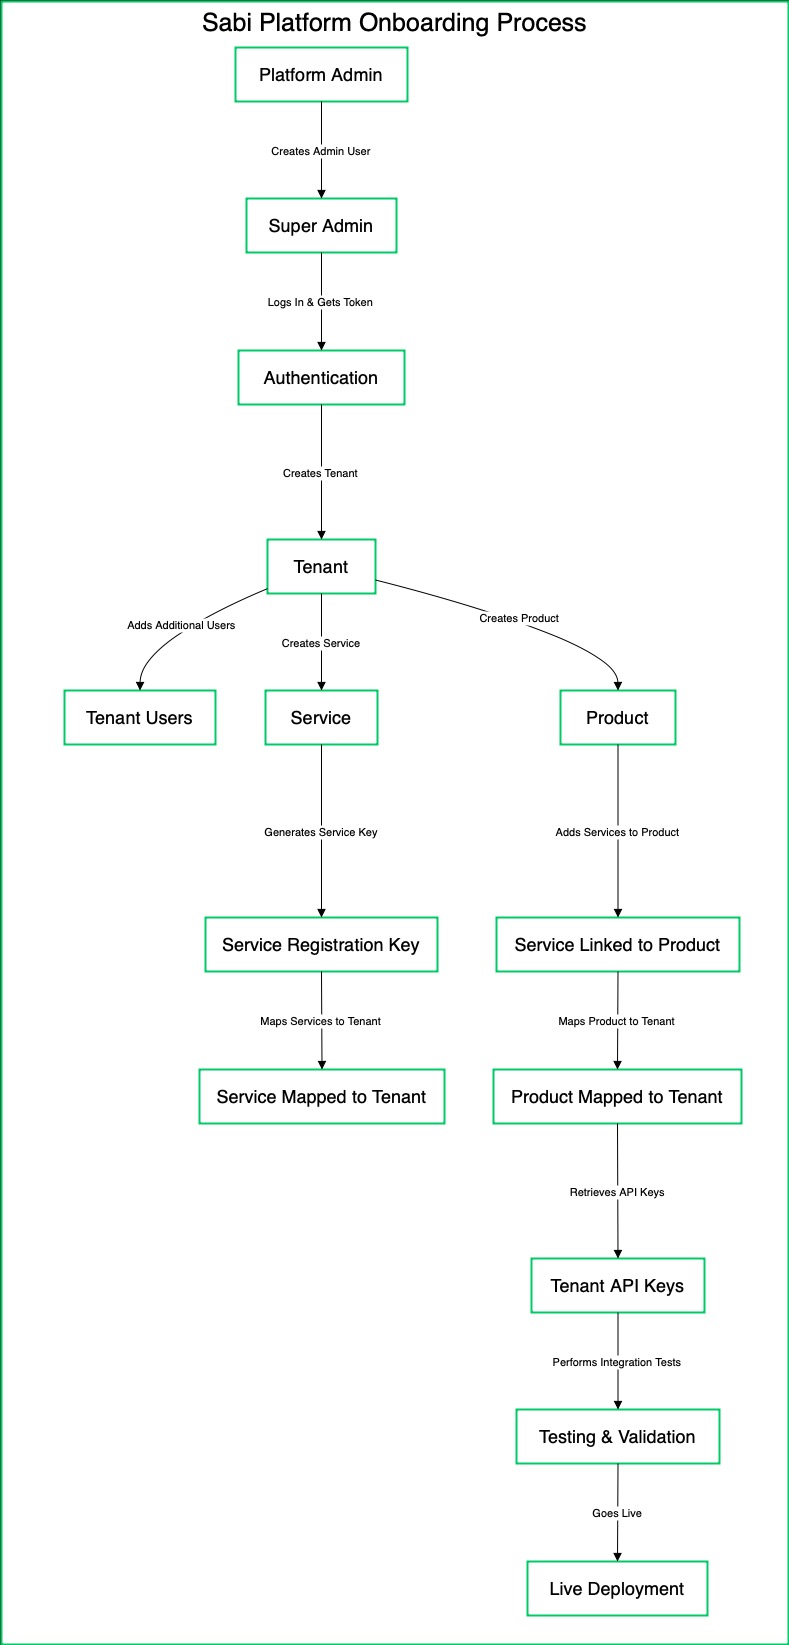
Welcome to the Sabi Platform! This guide is designed to help you, as a 3rd party user, seamlessly integrate with the Sabi Platform Registry. Whether you're a developer, a business owner, or a technical lead, this document will walk you through the process in a clear, step-by-step manner. By the end of this guide, you’ll have a fully integrated system that connects with Sabi’s powerful registry services.
Let’s get started!
Understanding the Basics
Before we dive into the technical steps, let’s take a moment to understand how the Sabi platform works.
Sabi is a marketplace infrastructure that connects businesses, service providers, and users through a structured API-driven registry.
As a third-party user, your role will fall under one of these categories:
- Platform Admins – Manage the overall platform and onboard businesses (tenants).
- Tenants (Businesses) – Register their services/products on the platform.
- Service Providers – Offer specific services that integrate into the Sabi marketplace.
Your onboarding experience will depend on which role applies to you.
Step 1: Create an Admin User
To start, you’ll need to create a user account. This user will act as the super admin for your integration.
- Endpoint: [
POST /api/v1/users/public](../../api/Platform Registry/Users/create_user.mdx) - What You Need to Provide:
- A unique email address (
username). - A strong password.
- User details like first name, last name, and phone number.
- The user’s role (e.g.,
TENANT_SUPER_ADMIN).
- A unique email address (
- What Happens Next:
- Sabi will create the user and return a response with the user’s details, including their wallet information and status.
- You’ll use this user to log in and perform further actions.
Step 2: Log In as the Super Admin
Now that you’ve created a user, it’s time to log in and get your authentication token.
- Endpoint: [
POST /api/v1/users/login/public](../../api/Platform Registry/Users/user_login.mdx) - What You Need to Provide:
- The username (email) and password you used to create the user.
- The user’s role (e.g.,
TENANT_SUPER_ADMIN).
- What Happens Next:
- Sabi will return an access token and a refresh token.
- The access token is your key to making authenticated API calls. Use it in the
Authorizationheader for all subsequent requests.
Step 3: Create a Tenant
A tenant represents an organization or business entity on the Sabi Platform. As a super admin, you’ll create a tenant for your organization.
- Endpoint: [
POST /api/v1/tenants](../../api/Platform Registry/Tenants/create_tenant.mdx)` - What You Need to Provide:
- The tenant’s name (e.g., your company name).
- The
userIdof the super admin you created earlier.
- What Happens Next:
- Sabi will create the tenant and return its details, including a unique
tenantId. - This
tenantIdwill be used to associate users, products, and services with your organization.
- Sabi will create the tenant and return its details, including a unique
Step 4: Create Additional Users (Optional)
If your organization has multiple users (e.g., managers, staff), you can create them now. These users will be associated with the tenant you just created.
- Endpoint: [
POST /api/v1/users/public](../../api/Platform Registry/Users/create_user.mdx) - What You Need to Provide:
- The user’s details (username, password, first name, last name, etc.).
- The
tenantIdof the tenant you created earlier. - The user’s role (e.g.,
MERCHANT).
- What Happens Next:
- Sabi will create the user and associate them with your tenant.
- These users can now log in and perform actions within the tenant’s scope.
Step 5: Create a Product
Products are the core offerings on the Sabi Platform. They can represent physical goods, digital services, or anything else your organization provides.
- Endpoint: [
POST /api/v1/admins/products](../../api/Platform Registry/Admin/Products/create_product.mdx) (for platform admins) or [POST /api/v1/products](../../api/Platform Registry/Products/create_product.mdx) (for tenants). - What You Need to Provide:
- The product’s name, overview, and category (e.g.,
WHITE_LABEL). - Configuration details for the product (e.g., mobile app settings, web app settings).
- The product’s name, overview, and category (e.g.,
- What Happens Next:
- Sabi will create the product and return its details, including a unique
productId. - You’ll use this
productIdto map the product to your tenant or services.
- Sabi will create the product and return its details, including a unique
Step 6: Create a Service
Services are additional functionalities that can be associated with your products. For example, a service could be a payment gateway or a notification system.
- Endpoint: [
POST /api/v1/admins/services](../../api/Platform Registry/Admin/Services/create_service.mdx) (for platform admins) or [POST /api/v1/services](../../api/Platform Registry/Services/create_new_service.mdx) (for tenants). - What You Need to Provide:
- The service’s name, overview, and requirements.
- Configuration details for the service (e.g., webhook URLs, API keys).
- What Happens Next:
- Sabi will create the service and return its details, including a unique
serviceId. - You’ll use this
serviceIdto map the service to your tenant or products.
- Sabi will create the service and return its details, including a unique
Step 7: Generate a Service Registration Key
To securely register services, you’ll need to generate a service registration key. This key is used to authenticate service-related API calls.
Endpoint: [GET /api/v1/services/token](../../api/Platform Registry/Services/generate_service_registration_key.mdx)
What You Need to Provide:
- Include the Authorization header with your access token.
What Happens Next:
- Sabi will return a service registration token that you can use to register or authenticate services.
Step 8: Add Services to a Product
Once you’ve created a product and a service, you’ll need to associate the service with the product.
Endpoint: [PATCH /api/v1/products/{productId}/tenants/{tenantId}/configs](../../api/Platform Registry/Products/add_services_to_product.mdx)
What You Need to Provide:
- The productId and tenantId for the product and tenant you want to configure.
- The service details to be added to the product.
What Happens Next:
- Sabi will update the product configuration to include the specified service.
Step 9: Map Services to Your Tenant
To make services available to your tenant, you’ll need to map them using the tenant and service IDs.
Endpoints:
- For Platform Admins: [
PATCH /api/v1/admins/tenants/{tenantId}/services/{serviceId}/map](../../api/Platform Registry/Admin/Tenants/map_tenant_to_service.mdx) - For Tenants: [
PATCH /api/v1/tenants/{tenantId}/services/{serviceId}/map](../../api/Platform Registry/Tenants/map_tenant_to_service.mdx)
What You Need to Provide:
- The tenantId and serviceId you want to map.
- Configuration details for the mapping (e.g., API keys, settings).
What Happens Next:
- Sabi will map the service to your tenant and return a confirmation message.
Step 10: Map Products to Your Tenant
Once you have created products, you need to map them to your tenant. This ensures that your products are accessible within your organization’s scope and can be utilized by users under your tenant.
Endpoint:
- For Platform Admins: [
PATCH /api/v1/admins/tenants/{tenantId}/products/{productId}/map](../../api/Platform Registry/Admin/Tenants/map_tenant_to_product.mdx) - For Tenants: [
PATCH /api/v1/tenants/{tenantId}/products/{productId}/map](../../api/Platform Registry/Tenants/map_tenant_to_product.mdx)
What You Need to Provide:
- The tenantId to specify which tenant the product belongs to.
- The productId of the product you want to map.
- Configuration details for the mapping, such as API keys, settings, or additional metadata (if required).
What Happens Next:
- Sabi will link the product to your tenant.
- You will receive a confirmation response once the mapping is successful.
- If you have multiple products, repeat this step for each one to ensure they are all mapped to the tenant.
Step 11: Retrieve Tenant Keys
Once everything is set up, you’ll need to retrieve your tenant’s API keys. These keys are essential for making authenticated API calls on behalf of your tenant.
- Endpoint: [
GET /api/v1/tenants/{tenantId}/codes/{code}/apikey/{apikey}?allowDelay=false](../../api/Platform Registry/Tenants/get_api_key_details.mdx) - What You Need to Provide:
- The
tenantIdandapikeyassociated with your tenant.
- The
- What Happens Next:
- Sabi will return the tenant’s API keys, which you can use to interact with the platform.
Step 12: Test Your Integration
Before going live, it’s crucial to test your integration to ensure everything works as expected.
- Test User Logins: Verify that users can log in and access the platform.
- Test Product and Service Mappings: Ensure that products and services are correctly mapped to your tenant.
- Test API Calls: Make sample API calls to confirm that your integration is functioning properly.
Step 13: Go Live!
Once you’ve tested your integration and everything looks good, you’re ready to go live! Start using the Sabi Platform to manage your products, services, and users seamlessly.
Need Help?
If you encounter any issues during the onboarding process, don’t hesitate to reach out to the Sabi support team. We’re here to help you every step of the way.